| Version: | 17.0.0 (build 272.2) |
|---|---|
| Revised: | December 27, 2024 |
Overview
The Unibook™ Character Browser is a tool developed by ASMUS, Inc. to present information about the characters defined in the Unicode Standard and the International Standard ISO/IEC 10646. Using Unibook, you can print and search listings of character codes and names, as well as display and search a variety of information about Unicode characters and their properties. Unibook can be used to look up unknown characters copied from a document and to generate the Unicode value for any character for pasting into documents.
Unibook takes a simple text file containing a character name list, plus some font and formatting configuration files, and produces fully interactive versions of both code charts and character name tables. These code charts can be used interactively to look up information on particular characters or character properties, including tracking cross references to other characters. They can be printed in a format resembling the standard documents.
Unibook allows you to view the characters supported by any font installed on your system and to print cross mapping tables for several other character sets to the Unicode Standard, based on the mappings built into and provided by the operating system.
Unibook has been used to produce the printed and online code charts for The Unicode Standard since Version 3.0, as well as code charts for all editions of ISO/IEC 10646 since 2000. (For that work, a non-public collection of fonts is used, which may differ in some details from the fonts available on your system).
The program can also be used to prepare drafts and proposals for future additions to the Unicode and ISO standards. While there is no editing support in the program itself, all changes in content can be made to the input files using plain text editors. You can also change the formatting of the resulting charts and nameslist by changing the formatting parameters in the dialogs and save these format settings as files. Another useful feature for proposal editors is the ability to create lists of characters and load them into Unibook for proofing.
About this Version: Unibook Version 15.1 build 270 will be used to print the alpha code charts for Unicode Version 15.1.0. It supports the properties and characters defined for Unicode 15.1.0. In addition, it provides a number of new features, such as support for upcoming scripts that need special support and for the display of standardized variations and alternate glyphs.
Note: This version of the Unibook distribution does not contain character property data. Data are available at http://www.unicode.org/Public/15.0.0/ucd/ (see installation instructions).
1. Setting up and Running Unibook
1.1 System Requirements
Unibook requires Microsoft WindowsTM 7 or later as well as a suitable collection of fonts to view the characters of interest. This version of Unibook has been tested on Windows 10, and to a lesser extent on later editions of Windows. Mac Users may run Unibook using Windows under Parallels.
1.2 Installation
Unibook will run best if all the supplied files are kept in the same directory.
- Download and Install character property data files as described in the next section.
- Download the Unibook Installation file.
- Run the installation file, Select the same folder for the installation as you used in step 1.
- The installer will run Unibook as the last step of the installation.
- Unibook will ask you to accept the license and give you additional Installation Options.
- Initially, the program comes up in a built-in default view using the fonts
selected in
default.cfl.
During installation Unibook will give you the option to set up Unibook as the default program to handle the UPR and LST file types, and to install a shortcut to launch Unibook from the desktop. You may manually install additional shortcuts in the taskbar by right clicking the Start button in Windows, selecting Explore and copying the Unibook shortcut from the desktop to the desired location(s) in the Start Menu folder.
Note: On Windows Vista or higher, you may replace the file Default.cfl by the file Vista.cfl to utilize the additional fonts present on those systems over Windows XP. Alternatively, from within Unibook, open the file Vista.cfl using the File / Open.. command followed by File / Save Project As... You can also edit these files in a text editor to add/remove fonts as described below.
1.3 Installing Character Property Data
Unibook requires the character names list data file as well as some of the character property data from the Unicode Character Data Base (UCD).
- Locate the version of the UCD you want to use (latest version)
- Download the zip files
UCD.zipandUnihan.zip - Extract these files into the Unibook folder on your system (for example
C:\Program Files\ASMUS-inc\unibook) - Install Unibook to that same folder, or go to Add/Remove Programs.. in the control panel and choose Repair for Unibook.
Notes: If you rename the file NamesList.txt to have the extension LST, as in NamesList.lst, you can open it in Unibook by double clicking on it. Several of the Unihan files are needed to create a multi-column layout for the CJK Ideographs. These include Unihan_IRGSources.txt and Unihan_RadicalStrokeCounts.txt. All other files are used to view and show properties for Han ideographs. If you do not require this, you do not need to install those other data files. During Install, you will be given a choice to create a concatenated file, or you may manually concatenate these files. See Installation Options.
1.4 Configuring for additional fonts
By default, Unibook opens the files Default.fmt and Default.cfl.
These are preconfigured to make use of some of the multilingual fonts
available via recent versions of Microsoft Office, Internet Explorer or Microsoft
Windows. Unibook will still run without these fonts installed, but Unibook may not be able to show as many Unicode characters as would be
possible by using these fonts on your system. Usually, all you need to do to
activate the use of these fonts is to install them on your system. The Default.cfl
is also set up to work with two large shareware fonts,
Code2000 and Everson Mono Unicode.
If you have one or both of these fonts installed, they will be used to
display any characters not already covered by other fonts. (See also
Font Table and CJK Fonts)
If you have additional fonts from other sources, first make sure they are installed in the Windows fonts directory. You can then modify and load a Combined Font List (*.cfl) file and a corresponding formatting configuration (*.fmt) file. For information on how to edit the sample files provided see Section 3, The input Files and their Formats. When loading *.fmt and *.cfl files, the best sequence to follow is to:
- Open an optional Format Configuration (*.fmt).
- Open a Combined Font List (*.cfl) file to tell the program what fonts to use
The second step will cause a complete re-layout and re-pagination. Once the program is initialized with a particular set of *.cfl and *.fmt files, it will reload the same files upon startup until a different set of files have been opened manually.
1.3 Opening a different Character Names List
By default, Unibook opens the file NamesList.lst. You can use the File / Open... command to open a different character names list (*.lst) file. This will cause a complete re-layout and re-pagination. After loading the names list, you may adjust the settings in the View / Show As... dialog to view the information in one of five modes, or select the View/ Character Set... command to switch into character mapping view. Once the program configuration has been changed, it will always return to the last selected configuration upon startup.
If you want to open the character nameslist file downloaded from the Unicode Character Database (NamesList.txt) it is best to rename the extension from "txt" to "lst" so Unibook can distinguish it from property data files. You can open a NamesList.txt file using the File / Open... command but, for example, you can only open a *.lst or *.upr, and not a *.txt file by double clicking on the file name.
1.4 Reporting Problems
If you should encounter problems, first see the section on troubleshooting at the end of this file. For ways to report problems or how to make suggestions, or to check on the availability of updates to the program or this file, please see http://www.unicode.org/unibook/.
2 Basic Operations
2.1 Views and Navigation
You can use Unibook to view and print characters in the following ways, called views:
|
|
Unicode Code Chart style view (charts, names, or both) | |
|
|
Index view | |
|
|
Character set mapping view | |
|
|
ISO/IEC 10646 view (deprecated) | |
To select a view, use one of these toolbar buttons, or use their corresponding dialogs via the View/Show As... command or the View/Characters... command. These dialogs offer additional customization of the view. (See also Viewing CJK Characters).
To navigate within a view use the ◄,►,◄◄, or ►►toolbar buttons, or use the PgDn / PgUp, Home and End keys in combination with the Ctrl and Shift (see keyboard reference). The first page of some views will display a summary file statistics and the filename, or it may be a blank page. In these case, use the PgDn key to begin viewing the contents.
Use the Backspace
key to return to a previously viewed page, or use the ![]() button. To navigate within each page, use the arrow keys or the scroll bars.
button. To navigate within each page, use the arrow keys or the scroll bars.
Any of the four basic views can be modified to display the results of highlighting a combination of properties:
 |
Highlight property or search result | |
 |
Use alternate highlight |
For example you can locate all Latin characters, by pressing F6
key or the
 button and selecting the
"Script ID" property from the UCD Additional tab. In the list,
click on the word "Latin" and press Enter.
All Latin characters will become highlighted. Use the
◄
or
►
toolbar buttons or the F7 or F8
keys to skip to the nearest page with a highlighted character, as described
in Viewing Properties below.
2.2 Lookup and Search
To search for a character by any part of its name use Ctrl-F or the Goto/Find... command. All characters matching the search expression will be highlighted. To search for all characters that have "LATIN" in their name, type "latin" into the Find box and check the Character information tab. Use the ◄ or ► toolbar buttons or the F7 or F8 key to view the pages containing these characters.
To go to a specific character by Unicode code value, including UTF-8, use Ctrl-G or the Goto/Go to... command. You can also locate an unknown character by pasting it into the Goto/Go to... dialog. To locate a character by Unicode block, use Ctrl-B or the Goto/Block... command.
2.3 Inspecting Characters
In addition to the major views, Unibook provides several ways to inspect individual characters via small popup windows, which are accessed by clicking on a character image or 4-digit hex code in chart or name list view.
The screen shot shows a sample Character Entry popup in Index View.
(To select index view, press the
![]() toolbar button).
toolbar button).
A character entry is all the information for a given character in the Unicode nameslist. By using the Ctrl or Shift key while clicking, other styles of character information can be displayed. For more details on the available information, see character popups in the command reference.
Clicking on a character code inside the popup brings up information about that character. Use this to look up more information about a cross reference, for example. Double clicking on any character code will jump to the associated charts or list page. To remove a popup, simply click elsewhere on the page or press the ESC key.
For a complete explanation of the special symbols used, and the meaning of each field, please see the description of the character code charts in The Unicode Standard.
Once a character is selected (that is, the popup is displayed), its character code can be copied to the clipboard using Ctrl + Ins or Ctrl + C, or its character name can be copied via Ctrl + Shift + C, or by using the right mouse button.
Character popups are also accessible in other views. On nameslist pages clicking on any part of a line that contains a character code (group of 4 hex digits) will access the character popup for the associated character. The type of character popup shown here requires that a character nameslist is loaded, for details on other views and popup types, see character popups in the command reference.
2.4 Viewing Character Properties
Unibook allows you to view all characters that share a given character
property, for example various types of punctuation characters. Use the View /
Properties..
command or the corresponding
toolbar button, either
 or
or
 , to select from several sources
of character property information. Within each source, for example "UCD
Properties", you can then select a
property, for example, you can select the "General category"
property and the value of the
property, e.g. "Po - punctuation, other".
This highlights all characters that correspond to this value of the property. Use the F7 or F8 key, or their equivalent toolbar buttons, ◄ and ►, to quickly navigate through all the ranges of characters with that property value.
Use the second toolbar button to select another property to highlight for comparison, or use the Goto / Find... command to highlight all characters with a common part in their name or description, for example the word "Mark". Characters that share both properties, are highlighted with split colors. The screenshot shows the result of these example selections.
See the View / Properties... command reference for more information on advanced modes, such as loading external property files or creating unions, intersections and complements of properties.
2.5 Viewing CJK Characters
The characters for Japanese, Chinese and Korean, together, make up the largest part of the Unicode characters. With the View/Show As... dialog you can select whether you would like to view any or all of these large subsets, and whether to display the Chinese ideographs in multi-column format. Multi-column format shows the character code, radical glyph and an index in the form <radical>.<# of strokes> on the left. To the right are several columns showing an official source mapping number for each country, below a country-specific glyph. Glyphs will be visible as long as fonts are installed for them on your system and configured as described in CJK Fonts.
In the CJK Unified Ideographs block, as shown, the columns are arranged in the order: Mainland China, Taiwan, Japan, South Korea, Vietnam and Hong Kong. Source mappings and glyphs for Macao and those defined as Unicode-specific, are shown on a second line, where they exist. Other blocks use a more compressed format, which leaves no gaps for empty columns. The exact details of the layout vary across both blocks and Unicode versions; the tool always uses the latest available format.
The character popups will show the following information:
- Formal character name
- An English gloss, where available
- Chinese or Japanese readings, where available
- UTF-8 bytes to encode the character
- UTF-16 code units for non-BMP characters
- Radical stroke index
- Source mappings defined for the character.
Source mappings identify the character, but do not necessarily correspond to a code point in any specific local character set. The English gloss for any ideograph can be searched like any comment information for a character.
In multi-column format, the blocks for CJK compatibility ideographs provide the same information as those for unified ideographs plus decomposition mappings and annotations.
2.6 Viewing Variant Glyphs
Many characters can be displayed with a range of glyphs. For some, Unicode defines Standardized Variation Sequences that allow the user to encode the preference for a particular glyph or subset of glyphs for a given character. If the nameslist provides the relevant information, and proper font support is enabled, Unibook is able to display the Standardized Variation Sequences defined for a given character, as well as provide a summary of all such sequences for a given block. Similar support exists for documenting certain alternate glyph shapes: glyphs that are commonly used for the character in question, but that have an appearance that's different enough to warrant documentation.
An example of a nameslist shows how the information is represented for individual characters:
If present, the same information is optionally summarized in tables like these:
The display of variant glyphs and summary tables requires special settings in the font configuration file, as well as the presence of fonts that contain the alternate glyphs. The variants of mathematical characters shown in these examples come from publicly available fonts.
2.7 Viewing Fonts
Pressing the
 button on the toolbar opens a
dialog for selecting a
single font. Use this to view all the characters covered by a specific
font. In addition to using the toolbar, you may also select a font to view with Options / Font.. command or
directly open
a TrueType font file with File/ Open.. command. The
latter is especially handy if you want to explore a font that you have not
yet installed in the Windows Fonts folder.
If the font contains characters in the Private Use Area, make sure that "Index" is selected in the View/ Show As... dialog and that the checkmarks for "Private Use" or "All Blocks" are enabled. In the Character Display tab under Options/ Format... check the "Do not mark private use".
To quickly find all characters supported by a given font, select "Font Coverage" in the Goto / Find... dialog. Type in the exact font name and press OK. Now you can navigate all areas covered by the font using the F7 and F8 key. To get back where you were before viewing the font, click the A button again, or use the Options / Reset font.. command. This reloads the most recently loaded font configuration.
2.8 Registry and project files
Unibook always stores the latest values and settings for formatting options and loaded files in the registry. You can save a particular set of formatting options to a file via the Save or Save As.. commands, and restore them via the Open command, by opening the corresponding ".fmt" file. Once a fmt file has been loaded, the information is kept in the registry. If you edit a *.fmt file with a text editor outside Unibook, you must reload it manually via the File / Open command for the change to take effect. You can use the File / Exit and Discard command to bypass saving changes to the registry. You cannot save the name for a font file opened for viewing, nor changes made to the font table.
Manually clearing the registry key associated with Unibook restores the program to factory settings. See Returning to Factory Defaults in the section on troubleshooting at the end of this file.
2.9 Working with multiple configurations
Unibook always remembers the last settings and starts up with the same settings the next time it is started. However, whenever it is desired to work with multiple configurations, for example in order to inspect an older version of a nameslist, or switch between different formats, saving all the settings (including the location of the nameslist) in a project file can be very handy. Loading a Unibook Project file (*.upr) file, loads all necessary files and settings at once. Project files can also be opened at startup by placing their file name on the command line.
Note: Project files contain a list of filenames for the various files for a given project, such as nameslist, formatting options file, font configuration file etc. If the contents of any of the files in a project are edited outside Unibook, the changes take effect whenever the project is reloaded. To save changes to a project file (i.e. after adding, or removing a file used in the project) use the File/Save Project As....command. Individual files that can be changed by settings in the program can be saved individually: to save formatting options in the current format configuration (*.fmt) file, use the File/Save... command.
3 Command Reference
3.1 Keyboard
| Key | Action |
| + | zoom in |
| - | zoom out |
| = | normal view |
| p | zoom out to view full page |
| w | zoom page margin to current window width |
| P | zoom out to view full width of the page of paper |
| W | zoom paper rectangle to current window width |
| PgUp | go to the next page (does not scroll on the same page) |
| PgDn | go to the previous page (does not scroll on the same page) |
| Ctrl + PgUp | go to the next 'section' (next 16 pages in index view, next block otherwise) |
| Ctrl + PgDn | go to the previous 'section' (previous 16 pages in index view, previous block otherwise) |
| Ctrl + Ins | place the selected character code on the clipboard |
| Arrows | scroll inside a page (up/down arrows will not scroll to a new page) |
| Ctrl + Home | Jumps to first page |
| Ctrl + End | Jumps to last page |
| Home | go to the first page on the plane (skips empty pages in some views) |
| End | go to the last page on the plane (skips empty pages in some views) |
| Ctrl + B | go to a given Block |
| Ctrl + G | Go to |
| Ctrl + P | |
| Ctrl + C | Copy the selected* character on the clipboard (as Unicode character) |
| Shift + Ctrl + C | Copy the selected* character name and hexadecimal U+ code number on the clipboard |
| Ctrl + S | Save to current configuration file |
| Ctrl + O | Open File |
| Back Space | Return to last page viewed |
| ESC | Clear open popup |
| F1 | Open help file (this file) |
| F5 | Show the View / Character set dialog |
| F6 | Show View / Properties dialog for the primary highlight |
| Shift + F6 | Show View / Properties dialog for the alternate highlight |
| F7 | Jump to the preceding page with characters of the currently highlighted property or search result |
| F8 | Jump to the next page with characters of the currently highlighted property or search result |
*) The selected character code is the one for which a popup is being displayed
3.2 Mouse
| Clicking on | Left Mouse Button | Right Mouse Button |
| Any character image in a chart or close to any character code in the names | Selects the character and displays more information
about the character or its glyph. By using the Ctrl or Shift key when clicking the style of information presented can be selected:
To permanently select the default style of information shown as result of a mouse click use the Options/Character Popup... dialog, or click on the character with the right mouse button. Using Ctrl + Ins or Ctrl + C after a character is selected places its character code on the clipboard Double clicking on a character in the code charts will jump to the nameslist page for that character. Double clicking on a character in the nameslist will jump to the code chart page for that character. |
Select modes for viewing characters:
Allows to copy the character code (Unicode value) or the character code plus name (in the U+XXXX CHARACTER NAME format) onto the clipboard. |
| Any character code in a popup | Changes the selection to the character
code and displays more information about it. Double clicking will jump to the charts page for the character. |
Select modes for viewing characters |
| Any other part of the page | No action | Presents a context menu of applicable operations |
Scrolling with the mouse wheel is supported, but like all scrolling in Unibook is limited to within the currently active page. To switch pages, use the keyboard commands, the navigation controls on the toolbar or the Goto menu.
3.3 Toolbar
Window Title - The title area of the main window shows information such as the currently viewed block, the selected properties or character sets (in Index view only), or the % completed during loading of a nameslist.
Toolbar - The Unibook toolbar gives access to some of the more frequently accessed commands. When hovering with the mouse over each button a short description of the button will pop up. The following list describes some of the buttons in more detail.
Buttons affecting views
Navigation buttons
|
Button |
Action |
| Go Back to the previously visited page | |
| Skip to the next chart page with a highlighted property or search result (whether primary or alternate highlight). | |
 |
Go to the next page. |
 |
Go to the next block, or, in Index view, jump 16 pages. |
 |
Go to the end of the charts |
Other buttons
The remaining buttons are for standard functions such as file open, save any, print and help.
3.4 Menu Commands
Menus
Selected Dialog Tabs
FILE
| Open... |
A variety of files can be opened. The name of any
opened file will be stored in the registry and, if possible, the file will be
reloaded upon startup. The file also becomes part of the current project and
can be saved to the project file with the Save
Project As... command.
|
||||||||||||||||
| Save All | Check the configuration, project and font table for changes and ask whether to save them to the registry as well as to the currently open *.fmt, *.upr and *.ftb files. This is automatically done on exit. | ||||||||||||||||
| Save Options As... | Save the format configuration into a specific *.fmt file. | ||||||||||||||||
| Statistics... | Show the number of entities parsed. This is most useful when editing the nameslist. | ||||||||||||||||
| Project... | Show all files that are currently loaded. File names shown
with an asterisk have changed since the project file was loaded. Unibook will prompt
you to save these file names to the project file on exiting. (For more
information, see the note under File / Exit...)
For property data files that reside in the same directory as the UnicodeData file only the base filename is shown. For most other files, as long as they reside in same folder as the Unibook Project file, only their base name is shown.
Property data files are loaded by the View / Properties... command. If you use the Remove command on a property data file, for example, DerivedAge.txt you will be prompted for a new file name next time you try to view the property with the View / Properties... command. All other files you can override with the Add... command which works just like File / Open... Use the Reload File command to force Unibook to re-read a particular file. This is useful if you have made changes to a given file.
|
||||||||||||||||
| Save Project As..... | Save the current list of open files into a new project | ||||||||||||||||
| Print all pages | This setting affects the Print... command. If selected, all pages will be printed | ||||||||||||||||
| Print even pages only | This setting affects the Print... command. If selected, only even pages will be printed. Use this to make a double sided printout in two passes. | ||||||||||||||||
| Print odd pages only | This setting affects the Print... command. If selected, only odd pages will be printed. Use this to make a double sided printout in two passes. | ||||||||||||||||
| Print... | Print the document in the currently selected view. In the print dialog, you can specify a range of pages, all pages, or the current page (some versions of the Windows print dialog show this choice as 'selection'). | ||||||||||||||||
| Recent Files | A list of recently opened files (up to nine). | ||||||||||||||||
| Exit | Terminate the program after saving the current
configuration to the registry. If there are unsaved changes to the configuration or the project file, Unibook will prompt and ask whether these
should be saved to their original files.
|
||||||||||||||||
| Exit & Discard | Exit the program but do not save anything to the registry |
VIEW
| Show As... | Selects between major views and enables optional
content.
Index - A compact 16x16 matrix format used by default when no nameslist is loaded. This is similar to the index style in the Unicode 1.0 book. A single page may contain multiple blocks. A few smaller blocks appear coalesced in this view and block names may be abbreviated. With the appropriate options selected, this view can be used to view any of the private use characters supported with the installed fonts. Charts Only - Displays just the charts, one block per chart. Names Only - Displays just the nameslist tables without intervening charts Book Style - Interleaves charts and nameslist tables. Does not display the private use area unless a private nameslist is loaded that contains private names for private use characters. Does not display empty charts by default. ISO Style - Creates framed nameslist tables with simple entries, i.e. without the extra annotation and cross reference lines present in a Unicode name entry. Show In Index - These options are only available in index view. If all are checked, it is possible to print a complete index for all code locations in the standard up to 0x10FFFF. (See also the section on Viewing Fonts). Show Large Scripts: Han, Hangul - With any of these options disabled, the display of the corresponding charts is suppressed, except for Index View. (Note: Some of these blocks may still be undefined in the Unicode Standard at release time of this version of Unibook.) Show Optional Content: Empty Charts - With this option disabled, chart pages that are empty because they cover an empty part of a block, or because of lack of font coverage, are suppressed. This also disables character information popups for the affected ranges. Show Optional Content: File Comments/ File Statistics - The NamesList.lst file may contain header information before the first block. Such headers or a summary of file statistics can be displayed on the first few pages by checking these options. Using these options will affect page numbering for all following pages, but page numbers are not shown on these optional pages. Show Optional Content: Variations summaries - Not enabled in all view. If enabled, selects display of alternate glyph and standardized variants summaries at the end of each block for which the nameslist contains glyph and variants information. Show Optional Content: Multicolumn Han - Not enabled in all views. If enabled, selects multi-column display for CJK charts.
|
| Character Set... | Select another character set to view. Currently this works only with
certain character sets installed into your copy of Windows, but usually that
includes a number of the more interesting character sets by default.
To see the UTF-8 bytes for any character, just click on that character to bring up the Character Entry popup. The same goes for the UTF-16 paired surrogate values for characters above U+FFFF. |
| Properties... Alternate Properties... Properties 3... Properties 4... |
Select one or more character properties to highlight using
the primary highlight color. You may
select properties that are built into the Windows operating system, or load
various external files (*.txt) from the Unicode Character Database or user
defined files (External Property).
The alternate properties commands are identical, except that it uses one of the alternate highlight color. Use the alternate highlight colors to compare one property to another. All characters matching the chosen property value will
be shown by highlighting with the current highlight colors. Use the Selecting multiple lines in the listbox ORs the properties together, that is, all characters matching any of the selected values will be highlighted. There are additional ways to highlight a combination of properties, see Set Union and Set Intersection. Multiple lines are ORed before applying Set Union, Set Intersection or Set Complement. Pressing the corresponding
toolbar button, for example
Windows - This tabs allows you to inspect three groups of properties built into Windows. UCD Properties - Use this tab to select one of eight groups of properties from the Unicode Character Database (UCD) and associated files. For example, selecting, General Category and Letter, Uppercase will highlight all upper case letters. Selecting a property from this tab will open a local copy of the corresponding data file from the Unicode Character Database. UCD Additional - Access a set of additional properties from the UCD. Some of these are collections of Boolean properties. UCD Auxiliary - Access a set of auxiliary properties published by the Unicode Consortium. External Property (user defined) - Highlight a single property defined by a list of characters loaded from a user-specified file using the format described in the section on Other Files. Instead of listing the properties, the list box lists the most recently viewed user-specified files. Files can be added to the list with the Open File.. button. Set Complement - Use the set complement, in other words, highlight all characters that do not match the property value. Set Union - Highlight all characters that match the current OR a previously selected property. Disabled if no other property is selected. Use Apply after selecting the first property and OK after selecting the property with which to union it. You can switch to a different tab, but do not close the dialog. Set Intersection - Highlight all characters that match both the current AND a previously selected property. Disabled if no other property is selected. Use Apply after selecting the first property and OK after selecting the property with which to intersect it. You can switch to a different tab, but do not close the dialog. Foreground color - Selects the text color to use for highlighting. Depending on how this command was invoked it affects the primary of secondary highlighting. Background color - Selects the background color to use for highlighting. |
| Zoom In | Enlarge the view by 25%. Display only. No zoom settings have any effect on printing. |
| Zoom Out | Reduce the view by 25%. |
| Page Width | Scale the view, so the width of the page margins fit the width of the window |
| Entire Page | Scale the view, so an entire page margin fits the window |
| Paper Width | Scale the view, so a page of paper fits the width of the window |
| Entire Paper | Scale the view, so an entire page of paper fits the window |
| 100% | Normal view |
| 200% | Double size view |
| 300% | Triple size view |
| 400% | Quadruple size view |
| 800% | Enlarged eight times |
GOTO
| Back | Return to last page viewed | ||||||||||||||||||||||||||||||||
| Page | Navigate by page. | ||||||||||||||||||||||||||||||||
| Section | Navigate by section. In index view, a section is 4096 Unicode characters or 16 pages, in all other views a section is a block. | ||||||||||||||||||||||||||||||||
| Property | Navigate to next/previous page with a highlighted property | ||||||||||||||||||||||||||||||||
| Find... | Locate and highlight all character entries matching a given
search string. Unibook always highlights all characters matching the
search expression, and then opens the nearest page containing one of the
characters found. You can use the
◄
or
►
toolbar buttons or the F7 or F8
keys to navigate to the next or previous page containing a matching
character.
You can search for characters based on their name, whether they are part of a given block or rang or are in a given font. Finally, you can search on any information in the character entry, such as comments, cross references and so on. Find What - The text to search for. For example, as shown, the search would find all characters that contain the words LATIN, GREEK or CYRILLIC in their names. A limited form of regular expression search is supported:
The information in the above list is displayed for reference when the Help button is pressed. The | operator acts on all characters on either side of the search expression, unless enclosed in a group as in this example: {LATIN|CYRILLIC} .* LETTER A. This example will find both LATIN and CYRILLIC characters whose name contains LETTER A. Character information - select this option to search character names or annotations. This can be fine tuned further by the Find in Character Names Only and Ignore Comments and Cross Refs options. If comments are ignored, then only aliases are searched along with the character name. The character code is always searched. Ranges and blocks - select this option to search for groups of characters by the title of their closest enclosing subheader or block name. This is most useful in looking for groups of characters, such as 'stars'. This option matches multiple headers for the same range. For example, in the Tamil block, the block name (Tamil) would match a search for that string, and a search for "various signs" would match the first character range because it is enclosed by its own subheader (Various signs). In the first case, the whole block would be selected, in the second case only the range spanned by the specific subheader. Font coverage - select to locate all characters covered by a given font (the font must be part of the font definition file, or have been selected via the Options / Font command) Highlight color - Use one of four highlight buttons, for example
Options - limits the search to exact match, matching case, information in the character name only. If character name only is disabled, you can limit the search to matches in character names plus aliases. Look in Unihan definitions enables search for the English gloss of CJK ideographs. After searching: In index view the number of characters that were
found to match the search is shown in the window title. If two sets are
active, only the combined count is shown (subtracting any overlaps). To jump to the next page containing a search result, use the
To clear the highlighting use the corresponding
toolbar button, for example
NOTE: To locate a character by UTF-8 value, use the Go To / Go To... command (Ctrl + G). |
||||||||||||||||||||||||||||||||
| Block... | Select from a list of blocks to jump to. This
list is taken from the block headers present in the NamesList.lst file. Blocks
can be sorted by range or name for easier access.
|
||||||||||||||||||||||||||||||||
| Go To... | Select a character, page or plane to jump to.
If character is selected Go To will jump to the names list page containing the character,
and bring up a popup for the selected character. If
plane is selected, Go To will jump to the first page of the given
plane, and bring up a popup for the first character. If page is selected, Go To will jump to that page number.
When the style Auto Detect is selected, a character code can be given in one of these formats:
The screenshot shows an example using UTF-8. Auto detection ignores any extraneous data following a character code. In case auto detection of the format fails, or gives an unexpected result, select a specific format. |
OPTIONS
| Font |
Overrides the current *.cfl file
with a single font. This is useful to quickly
inspect the contents of a given font. This feature supports TrueType and
OpenType fonts that are
Unicode-encoded. This command ignores any non-zero offsets in the ASCII offset field.
Since the override is not remembered when the program exits, use a *.cfl file
for permanent changes in font assignments. This command works best in Index view, see the View / Show As... command. To limit the display to only those pages containing characters supported by the font, use the font search feature of the Goto / Find... command. To switch to another font collection, to view a *.ttf file not installed in the Windows fonts directory, use File / Open.... |
||||||||||||||||||||||||||||||
| Reset Font | Restores the previously loaded font configuration. | ||||||||||||||||||||||||||||||
| Format.. |
The format command provides access to these dialogs:
The *.fmt files provided with Unibook.exe will set up consistent sets of page setup values that are independent of the nameslist or output document. The items that are expected to vary from job to job are the initial table and page number. The chapter number is used only when "include in page number" is selected. All format choices are retained in the Windows Registry upon program exit, but can also be saved explicitly. |
||||||||||||||||||||||||||||||
| Character Popup.. | Select the format of the popup. Supported formats are
|
||||||||||||||||||||||||||||||
TOOLS
| Bidi Demo... | Runs the bidi sample code. The code executed is the sample code published with Unicode Standard Annex #9: Unicode Bidirectional Algorithm. This demo uses a pseudo-alphabet as input and displays several sets of internal values used by the algorithm. (Additions to the bidi algorithms post Unicode 6.0.0 have not been reflected). |
| LineBreak Demo... | Runs the line break sample code. The code executed uses the pair table published with Unicode Standard Annex #14: Line Breaking Properties, using the sample driver functions published as sample code. This demo uses a pseudo-alphabet as input and displays several sets of internal values used by the algorithm. |
| Save Selected Characters... | If you highlighted a property (or combination of properties), or loaded an external file, or created a search result, you can save a shorthand list of all character codes affected, by using this command. The result will be a plain-text file, formatted similar to the data files in the Unicode Character Database. You can read the saved file with the Open File... command on the External Property tab of the View / Properties.... dialog. |
| Print Block | Print the current block.
|
| Print All Blocks | Prints all blocks (One block per file).
|
| Print highlighted blocks | Same as previous, only prints blocks that have highlighted characters in them. |
HELP
| Info | Gives a pointer to this file. |
| About... | Brief information about the copyright, version number and the authors. Access to the legal license text. |
3.5 Additional Dialogs and Dialog Tabs
Page Setup Tab
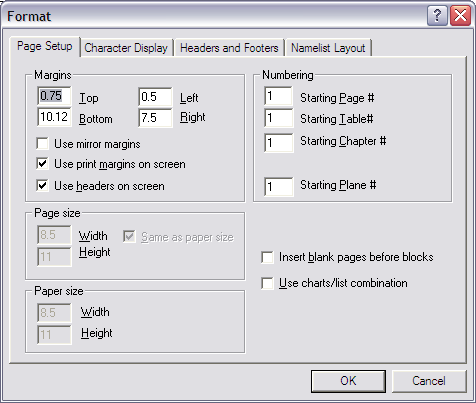
Note: The default settings are shown. The page size values can be varied, but the paper size values are fixed. To print on A4 paper, use a printer driver that can center an 8.5 × 11 print image on an A4 page. The default margins are narrow enough so that the resulting image fits on an A4 page.
Margins - sets the margins for character name tables in inches from the top left corner of the page. The character code charts use the same margin setting, but have a fixed height based on their cell size. They are placed so they rest on the bottom margin.
Note: for each cell size, the height of the margin rectangle is effectively constrained, or charts and text will not line up.
Use charts/list combination - print narrow charts that have only a single column of names on the same page as their names.
Page size - change the page size (Only a fixed page size is available, however, the default margin settings are adjusted such that printing to PDF, the output can be centered to either a A4 or US Letter size).
Character Display Tab
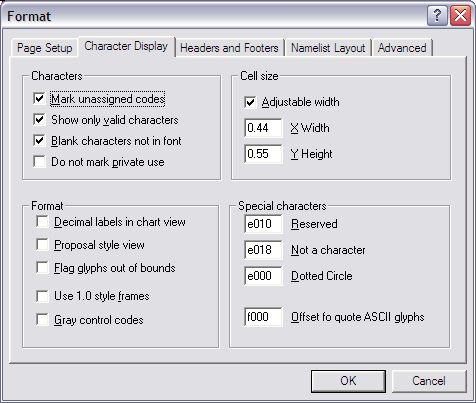
Notes on the "Characters" settings:
Mark unassigned codes - This draws a diagonal hatch in all unassigned character locations as well as in private use. Disable to view fonts that have glyphs in the private use area, or at as yet unassigned code points.
Show only valid characters - This blanks out any characters for which there are no entries in the nameslist. Disable to view fonts that have glyphs in the private use area or glyphs for characters of a later version of Unicode than the nameslist loaded by the program.
Blank characters not in font - Suppresses the 'default glyph' by the font.
Do not mark private use - don't mark private use area as unassigned - useful for viewing fonts that have glyphs for private use characters. Unlike Mark unassigned codes does not affect non-private use characters.
Proposal style view - replaces part of the character code with X or XX to indicate that code points are tentative. Useful when using Unibook to create proposed code tables.
Adjustable width - reduces the cell width for wide charts to fit 16 columns per page.
Notes on the "Special Characters" settings:
Reserved: the character code for the glyph used to show a reserved character
Not a character: code for the glyph for the not a character symbol
Dotted circle: code for the dotted circle glyph used to show combining characters
ASCII offset: This is needed since there are many characters (e.g. SPACE, NON-BREAKING SPACE and TAB) which are used both as non-printing characters and shown as special printing symbols. Using a non-zero offset and translating a font to the same offset allows the program to switch between these offset and non-offset codes to select between chart (offset) symbols and text (not-offset) characters. This value is ignored when using Unibook to view individual fonts (via Options/Font..) dialog.
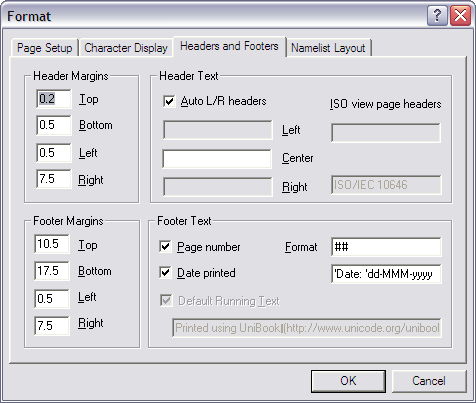
Page Headers Tab
Margins - sets the header and footer margins in inches from the top left corner of the page
Auto L/R Headers - derive headers from the block and character range
Footer Text - options for formatting the footer
Note: The default settings are shown. The ## in the page number field is a place holder for the page number, "Page ##" would print the word "Page" in front of the page number. For the print date field, enclose any literal string in quotes, as in the example. Use d, M, and y singly, or repeated up to four times, to select different formats for day, month and year. These may be placed in any order.
Nameslist Layout Tab
The parameters in this tab affect the layout of various elements in the nameslist. Usually these need no modifications. For proposals or private nameslists, the number of columns can be set to a value larger than 2. This will conserve pages if all character entries consist of very short names.
Note: The default settings are shown. The indents and tabs work together in aligning the elements in a character entry, with the indents being relative to the second tab stop value. Some of the values are unused in the current version of Unibook and the corresponding input fields have been disabled.
Installation Options
These installation options are presented only when a new version of Unibook is run for the first time.
Files - Checking these boxes allows you to double click on files with extensions
*.uprand open them as Unicode project files, or on files with extension*.lstand open them as nameslist files. (Nameslist files that have the extension*.txtcan only be opened using the File / Open... command.)Shortcuts - Checking any boxes in this section creates the corresponding shortcuts for launching Unibook.
Unihan Database - The Unihan database has been split into a number of files, but Unibook requires that the whole database reside in a single file (by default called Unihan.txt). Checking the first button will make sure that Unibook creates a consolidated Unihan Database file. You may be asked to confirm the overwrite of any existing Unihan.txt file, as well as the location of the constituent files. The minimally required files include the IRG sources and the Radical Stroke Counts. These data are needed to display the multiple column CJK Ideograph tables. Adding the other information makes the file parsing slower, but allows you to display and search additional fields from the database.
You may manually concatenate any number of
Unihan_*.txtfiles - they may occur in any order in the final file.
4 The Input Files and their Formats
You can create your own character charts. To create a character chart you must supply
- a project file
- a nameslist file
- a formatting configuration file
- a combined font list
- a combining character layout file
- several auxiliary files
These input files are described in more details below. Unibook can read files using little-endian UTF-16, marked with a byte order mark (BOM) or files using UTF-8 and marked with a UTF-8 encoded BOM. Absent such markers, most files using ASCII, ISO-Latin-1 or Windows code page 1252 will work fine. Nameslist files containing a special declaration in the first line, will be parsed as UTF-8 whether or not there is a UTF-8 encoded BOM. Nameslist files lacking any information they will be opened as Windows codepage 1252 (superset of ISO-Latin-1). Files from the Unihan Database will always be opened in UTF-8 format.
4.1 Unibook Project File (*.upr)
A project file is a list of filenames for a consistent set of files. Usually, when you first start a new installation of Unibook, it reads a file called Default.upr, which contains a list of all the other files. You can view the list of files with the File/Project... command. As you load files using the File/Open... commands, this list changes. The current list is kept in the registry, but you can save it to file with the File/Save Project As... command. Especially when working with multiple configurations it is really handy to have dedicated project files. These files can also be edited with a text editor.
4.2 Nameslist File (*.lst)
The names list is a plain text file that contains Unicode character codes, character names, cross references, block headers and many annotations. Normally there is no need to make any changes to this file. However, a detailed syntax description is provided in the Unicode Character Database and in an online documentation file. By following this syntax it is possible to create name lists for proposals for characters not yet encoded.
By default, Unibook loads the file NamesList.lst. Note that Unibook expects that the filename for the nameslist end in an extension ".lst" to distinguish the nameslist file from the data files for character properties. The most up-to-date version of this file always resides on http://www.unicode.org/Public/UNIDATA/NamesList.txt. If you want to upgrade to a more up-to-date copy, just save this file to your Unibook directory and rename it so the file name ends with ".lst".
Note: Unibook will complain loudly and insistently if there are syntax errors in a character nameslist. The public beta versions of the nameslist sometimes contain such errors. Usually clicking 'ignore' will safely let Unibook continue (if you know how, you can always fix your copy of the nameslist using a plaintext editor).
If you make edits to the nameslist file, make sure to save it either in one of the supported encodings. These are either UTF-8 or little-ending UTF-16 with a leading Byte Order Mark (BOM), or unmarked UTF-8 with a charset declaration in the first line:
; charset=utf-8
Without either a BOM or a charset declaration, Unibook opens all nameslist files as if encoded in Windows code page 1252 (a superset of the ISO Latin-1 character set). This is independent of the system code page.
Up to and including Unicode, version 6.1, the published Nameslist.txt files are encoded in Windows code page 1252. From Unicode, Version 6.2 this switches to UTF-8 with charset declaration.
4.3 Formatting Configuration File (*.fmt)
A *.fmt file is a simple text file each line of which has the following form
key = value
where the values are either hexadecimal numbers or strings. Empty lines and lines starting with ; are ignored. The keys are defined by the program and correspond to entries made in the formatting dialogs. Once a configuration is loaded, or created by changing options in the program, its information is stored in the Windows registry and directly accessed from there. This file is normally not edited outside the program.
Any configuration can be saved to a new file at any time with the File/Save As... command.
4.4 Combined Font List (*.cfl)
No single font can cover all Unicode characters. Because of that, Unibook combines fonts at run-time. Internally it treats such a combined font as if it were a single font covering all characters. Therefore, Unibook behaves like a plain text formatter and does not use style markup to determine the fonts used for different ranges of characters; instead, it determines the font by character code using the information supplied in a combined font list.
A combined font list (*.cfl) file is a plain text
file that list the fonts to be used for this combination. Unibook searches the list of
fonts in order from top to bottom for each character until it finds a font that
contains an glyph image for the given character. Unibook will complain about
any font entry that is unused, because earlier fonts cover all the
characters provided by that entry. Either change the order, or remove the
entry by deletion or by commenting it out.
Because cfl files are plain text files, they can be
edited in text editors, such as Notepad. Unibook accepts files both in an active Windows code page,
or as little-endian, byte-order marked UTF-16.
The latter is handy whenever font family names contain non-ASCII characters.
(UTF-8 is not currently supported) The
easiest way to create a CFL file that can capitalize on the fonts available on
your system is to edit the Default.cfl file and save it under a
different name. Note that Unibook complains about redundant (unused) entries
in any CFL file, other than Default.cfl. Just remove or
comment out any unused
lines.
4.4.1 Entries in the *.cfl file
Each entry in a combined font list is a single line that describes the font with name, size and optional style attributes as well as with what character code-ranges they should or should not be used for. A minimal example would be
Arial Unicode MS,22
This entry would cause the Arial Unicode MS font to be used for every character, except those, for which Arial Unicode MS doesn't have a glyph, or those for which another, earlier font already had a glyph. The size in points is required. The value 22 is used by the Unicode code charts.
There are special parameters that can be used to limit the use of the font to specific character code ranges. If a character is outside the ranges set up for a font, Unibook continues to search. For example, the entry
My Greek Font,22 /X=0000-10FFFF /I=0370-03FF
would enable My Greek Font for the Greek code range, but prevent it to be used for any other characters it might contain. The initial range /X=0000-10FFFF which is effectively an "exclude all" is optional. Unibook will supply it when it encounters an /I command without any preceding /X commands.
Sometimes it's useful to use a glyph from a font where it is not at the correct location, or perhaps treated as glyph for a private use character. Add a set of switches /Q ("quote at") and /R ("range") as in this example
'Times New Roman',22 /Q=212B /R=00C5-00C5
which uses the glyph for A with ring at location 00C5 for Angstrom at location 212B. The /Q command defines from which Unicode point forward the glyphs from the font should be used. The /R command defines the range of glyphs to be used (in this case just a single glyph). The parameters for the /R command give the location of the glyphs in the font; in many cases these may be in the private use area. Note that this style of font entry has an implied range restriction, in this example it would be /X=0000-10FFF /I=212B-212B.
4.4.2 Special issues
Special Ranges in CFL file. There are two special character code ranges used internally by Unibook when displaying running text interleaved with specimen images of character codes. While used internally, these ranges affect where in a font Unibook looks for certain glyphs.
By default, the range 0000-00FF is used only for glyphs that make up the running text (e.g. character names and comments). It is not used for the character codes in the code charts. The private use range F000-F0FF is used instead. For example, if the font for the text in character comments is supposed to be Myriad Pro Light, as was the case for the Unicode 5.0 book, while the Latin Characters in the code charts are supposed to be in 'Times New Roman', the font configuration list must have two entries such as
    Myriad Pro Light, 22 /I=0020-00FF           ; ASCII/Latin-1 characters in nameslist text
    'Times New Roman', 22 /Q=F020 /R=0020-00FF    ; ASCII/Latin-1 characters in code chart
in addition to an entry like this further down in the file
'Times New Roman', 22
which covers the remaining Latin characters for the code charts (as well as Greek, Cyrillic and other characters provided by that font).
The location and size of that range can be customized in the Display Characters tab in the Options / Format.. command. An offset of 0000 disables the feature and uses the same font for both code images and running text.
The other special range is used for printing the digits of code points values in decompositions, comments and cross references. For example, if the use of Arial Narrow is desired for this (as is the case for the default setting) the font configuration list must contain this entry:
Arial Narrow,20, /O=E200
This range cannot be customized or disabled. A different font may be substituted, but best results are achieved only when the font has matching heights for decimal and hex digits, and preferable matching widths as well.
CHARSET. Some fonts require a CHARSET specifier. The recognized values are:
|
|
|
If a font can be viewed with the Options / Font... command, but doesn't show up when added to a *.cfl file assume it's missing a charset and try a likely value from the list above.
For any font entry you can supply an optional style attribute, for example BI for bold italic. For example, you can "fake" a font for the math italics by these entries
    'Times New Roman', 22, I /Q=1D434 /R=0041-005A
    'Times New Roman', 22, I /Q=1D44E /R=0061-007A
4.4.3 Advanced features
These features exist to support production quality charts.
Some fonts have an unusually placed baseline. Using the baseline shift parameter, Unibook will shift the font up or down. Try the effect with small values (<10) and observe the effect.
Combining marks are displayed above a dotted circle. The Unicode character
25CC DOTTED CIRCLE is usually too large for this purpose, so a special (private
use) code point can be selected in Unibook, see the
Display Characters tab in the
Options / Format.. command. Make sure that you supply an
entry in the *.cfl file that covers this character code. (Default.cfl
uses the specials.ttf font for that purpose).
Some fonts have their own dotted circle at a special location, which is designed to work best with the glyphs in that font. The /C command selects the character code to use for that font only.
Some fonts need a point size smaller than 22 or they will overrun the sides of the character cell in the code chart grid. When the font is scaled for the nameslist, the point size may be too small. As there is proportionally more room available in the nameslist, you can use the /M command to give a minimum size value for that font and select the value for good fit in the nameslist.
4.4.4 CJK Fonts
Fonts for Chinese ideographs for use in China, Japan, Korea and other countries
use slightly different glyphs for the same ideograph, with somewhat systematic
variation based on the typographic traditions of the particular country.
Because there are more ideographs than the maximum number of glyphs allowed
in the TrueType font format, multiple font files may be needed to show all the
glyphs in used for a particular country. For the standard
display, a single CJK Font style is defined by providing entries in the main
Combined Font List. The multi-column Han format (see View/Show
As...) shows each ideograph
with the multiple glyphs for each country. For use with this format, a special *.cfl file is defined, which
contains multiple sections. Each section defines the glyphs
to be used in one of the columns. At startup, Unibook loads the file CJKDefault.cfl,
which selects suitable fonts that are expected to be widely available.
You can modify this file in a text editor and save it to a different name. You can then modify your project file to refer to the same name and reload the project via the File/Open... command.
4.4.5 Syntax
The following summarizes the syntax for a font entry:
<Facename>, <point size>{, <baselineshift>}{, <charset>}{, {B}{I}{U}} {<params>} {<switches>}
where:
<Facename>name for a windows font, max 32 characters <point size>positive decimal number in pt, 22 is the default <baselineshift>signed decimal number, in points, positive shifts down, +-5 is a typical value <charset>one of SYMBOL, ANSI, SHIFTJIS, etc from table above <params>{/M=ddd }{/A=ddd} {/C=xxxx}B I U L Msingle capital letter indicates bold, italic, underline, light, medium respectively <switches>{/S=xxxx | /O=xxxx} <limits>
{/Q=xxxx /R=<range>} <limits>
{/U=xxxx /E=xxxx} <limits><limits>{{/X=<range>}* | {/I=<range>}*}(any combination of
/X=<range>and/I=<range>)<range>xxxx-xxxx/S=xxxxfirst character code in font for a "chart font" /O=xxxxoffset to add to character to access glyph in font /X=<range>exclude the following range, i.e. don't use this font for this range /I=<range>include the following range, i.e. override any /X for this range /Q=xxxxallows arbitrary selection of a <range> of glyphs /R=<range> from a font starting at character xxxx /U=xxxxUTF-16 coded font (not offset), starting at xxxx /E=xxxxgives ending code location for UTF-16 coded font /M=dddsmallest effective point size, if the value is 0, this parameter is ignored /A=dddhorizontal adjustment when laying out combining marks for chart glyphs, in points, positive adjusts to the right /C=xxxxuse this glyph for base character (for this font) { }contents in braces are optional |alternative *0 or more <name>named subexpression ,literal comma, may be followed by white space /literal slash =literal equals ddddecimal number xxxx4-6 digit UPPER CASE Hex number
4.4.6 Additional notes, restrictions and requirements:
Facenamemay contain spaces and must be terminated by a comma- A point size must be provided, the usual size is 22
- You must provide at least one entry with an /O=E200 command (or
an equivalent /Q command) for example
Arial Narrow,22, /O=E200
This font is used for the digits in the nameslist. A font for which digits and capital letters align and have similar widths works best for the purpose. - If the first /I command comes before the first /X command, Unibook automatically excludes all characters before including the <range> specified with the /I command.
- Using the /S command, implies font is a Unicode Chart Font (see below)
- Using the /O command implies that a font contains a fixed range of 128 characters starting at xxxx, unless an /X or an /I switch is provided to limit or extend its range further.
- The /Q command works like a combination of /O and /X - it is more convenient to use when only a single range of characters is to be extracted from the font.
- The /U command is obsolescent, it is not needed for ordinary fonts containing supplementary characters
- Setting the minimal effective font size with the /M parameter can be used to limit the point size reduction for a font used in the nameslist.
- B, I, U, L, M and hex digits must be capital letters, but all switches are supported for both cases, e.g. /X and /x The B, L, and M flags correspond to numerical weights of 700, 300 and 500, with regular weight (no flag) being 400.
- Whitespace is required as separator, wherever a space is shown without a comma; following a comma, whitespace is optional. In all other cases whitespace is prohibited.
- Empty lines, lines starting with ";", or any part of a line following a ";" are ignored.
4.4.7 Font File Sections
Font files are divided into named or anonymous sections. Lines starting with $ contain a section identifier and begin or resume a section. For the section identifiers, only predefined values are supported. Unrecognized section values are ignored, and information in such sections is skipped. Multiple instances of the same section identifier are permitted and continue a given section.
The expression $$ defines the anonymous section and the expression $* defines a common section. The anonymous section is the default section. The font definitions in the anonymous sections apply whenever none of the named sections apply.. The font definitions in the common section are considered part of every section; they are loaded in the order of the position of their appearance in the file relative to the anonymous or named sections. Usually, a common section takes the form of a preamble or alternately, it may be repeated at the end, providing a global fallback. The common and anonymous sections are supported only in the main combined font file.
For the multicolumn view for CJK
ideographs, section identifiers corresponding to CJK sources are supported..The supported values are of the form "$GSOURCE", etc. including one value
"$RADICAL" for the font used to display the image of the radical that is part of the radical-stroke information.
(The source names are defined in the Unihan database. Compare the file CJKDefault.cfl.) For each code point, Unibook queries the range of applicable sources and then attempts to locate the corresponding font file section. In determining which font to use, only fonts from that section (or the common section) are considered.
Note: some scripts, that are CJK-like, are also supported using that scheme. From build 263, Unibook supports sections named "$TANGUT" and "$TANGUTRADICAL", and from build 270, sections "$SEAL", "$SEALRADICAL" and "$SEALMODERN" are supported.
Glyph variations selected by variation selectors are defined in the main combined font file by sections named after the variation selectors. Supported values range from $FE00 to SFE0F and $180B to $180D. For some variation selectors, different glyphs are selected based on positional context. Positional context (such as "isolate") is specified in the font file by a section where "_isolate" is appended to the variation selector, for example, $180B_isolate. Unibook attempts to read such sections as it encounters variation lines in the input that use the given variation selector in the given context. If no corresponding section is found, Unibook reports the omission and treats the glyph as a missing glyph. (The positional identifiers are specified in StandardizedVariants.txt in the Unicode Database).
A series of alternate glyph selectors, named ALT1 to ALT9 can be used like variation selectors to document up to nine different alternates for the ordinary chart glyphs, such as the $ symbol with single or double bar, or the integration sign in upright or slanted style. Syntactically these are treated like variation sequences in the namelist, but unlike variation selectors for variation sequences the ALTn designators are never found in encoded text - they are simply a syntactical artifact to support documenting a range of glyphic representations of a code point; the ALTn designators are never shown in the Unibook output.
To specify fonts that contain the requested alternate glyphs, use font file sections named $ALT1 through $ALT9.
4.5 Font Table (*.ftb)
The combining font list defines the fonts used for all characters in the code charts. The fonts and font styles for all other text are defined in the Font Table. The font table is a simple file that shows which actual fonts correspond to a particular, internal, font identifier. Each line consists of the following pattern:
<font identifier> "=" <font description>
where the font description is a subset of the font description used in the combined font list. The font name that is part of this description can refer to an installed Windows font, or to the file name and section for a combined font. In the latter case it is expressed as
More formally, a Font Table entry is defined by a string of the form
<Facename>,{ <point size>},{{B}{I}{U}{L}{M}}{, <baseline shift>}{,<CHARSET>}
For combined fonts defined for CJK sources, the descriptor uses the syntax
"*("<cjk combining font file name>{"$" <section>} ")",{<point size>}{,{B}{I}{U}{, <baseline shift>}}
section is a CJK font source name such as MSOURCE. In the above BNF syntax, quotes around literals B,I,U,L,M and comma have been suppressed.
For the main Chart Font defined as a combined font in the main *.cfl file, an alternate syntax is supported for backwards compatibility:
"*("<Facename>")",{<point size>},{{B}{I}{U}{L}{M}{, <baseline shift>}{,<CHARSET>}}
Where the Facename is ignored other than as a fallback and the font file name is given in the project file.
4.6 TrueType Font File (*.ttf)
In addition to viewing fonts already installed in the Windows font folder, you can use Unibook to load any TrueType or TrueType-based OpenType font contained in a file with the *.ttf extension. After loading the file, Unibook will open the Choose Font.. dialog, just as if you had used the Options / Font... command. However, the list of font will now contain the fonts from the font file that has been loaded. Loading additional fonts, unloads previously loaded fonts. All fonts are unloaded when Unibook exits. Font files for viewing are not part of the current project, and can't be saved.
4.7 Combining Character Layout File (*.cmb)
The combining character layout file determines whether a character is shown with a dotted circle and how it is positioned relative to the dotted circle. The first column of the file contains a character code or character code range using upper case hex numbers. The second column is optional. Where it occurs, it is separated by a semicolon from the first column and consists of one of the mark layout instructions from the following table. Whitespace around and between fields is ignored.
Mark Layout Instruction #
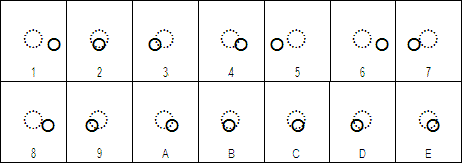
Result FONTMETRICS 1 combining mark layout uses font metrics CENTER 2 center ink on ink LEFTOVERHANG 3 center mark ink on left shoulder of base RIGHTOVERHANG 4 center mark ink on right shoulder of base REORDRANT 5 display mark ink left of base with a fixed gap RIGHTSPACING 6 display mark ink right of base with a fixed gap LEFTKERN 7 1/4 of mark ink will overlap the base, otherwise like reordrant RIGHTKERN 8 1/4 of mark ink will overlap the base, otherwise like spacing CENTERLEFT 9 right edge of mark ink is centered on base ink CENTERRIGHT A left edge of mark ink is centered on base ink CENTERLEFTKERN B right edge of ink is positioned 1/4 right of base ink center CENTERRIGHTKERN C left edge of ink is positioned 1/4 left of base ink center OFFCENTERLEFT D like CENTER, but mark is nudged left 1/4 of base width OFFCENTERRIGHT E like CENTER, but mark is nudged right 1/4 of base width
The following illustrates the mark placement in the order of the entries for the table above. The index numbers in the table refer to the illustration below and have no other meaning. Case 1 illustrates the placement based on font metrics - in this case, the glyph is a spacing glyph in the font. In all other cases, the font metrics are completely ignored except that the vertical placement is as determined by the font.
Cases 9 and D and cases A and E happen to look nearly the same with the sample mark, because the mark is nearly 1/2 the width of the base. The difference is that in the former cases one of the edges of the mark is aligned at the center of the dotted circle and in the latter cases, the center of the mark is aligned at two different points which are 1/2 the width of the base apart. For very wide or very narrow marks, these layout options will produce different results. In particular, no part of a mark will cross the center of the base in cases 9 and A, no matter how wide the mark, and conversely, for a narrow mark, the edge of the mark will not reach the center in cases D and E.
To enable the use of Mark Layout Instructions the file must use the format and commenting conventions for a UCD property data file, where '#' is the comment character and ';' is the field separator. Unlike a UCD property data file, the second column in a cmb file is optional; it may be entirely absent, or present on some lines only. A missing field is equivalent to a field with the FONTMETRICS instruction. The file should have an explicit default declaration of the form
# @missing: 0000..10FFFF; FONTMETRICS
somewhere in the comment section in the file header.
Older style combining character layout files use ';' as the comment character and have no recognized field separators. For these older files, only the first column (containing a character code or code range) is interpreted and used to determine whether a combining mark is to be shown with a dotted circle. The old format for cmb files matches that described under Other Files.
4.8. Other Files (*.txt, *.rtl)
All other files are simple lists of character codes, or character code ranges, one code or one range per line. Comments are allowed, and all text following the code on the line is ignored. Character codes must be 4-6 hex digits long and may not use lower case.
Example:
; this is an example comment
007E
10AB	;this text gets ignored
2224
4E00..AC00
The meaning of the file depends on the extension or on the command used to open it.
A *.rtl file is used to list all the combining characters that overhang to the right instead of to the left. Whether or not this information is needed depends on your fonts.
A *.txt file can be used to list all the characters that should be highlighted, via the View / Properties command. This is very useful for quickly verifying lists of characters. Transfer the list into the format given above and load it with the View / Properties / External Property command, select the highlight colors, and you can view the list by paging through the list of characters, easily spotting missing or extra characters in your file.
The Unicode Character Database and Additional Properties Tab load specific files from the Unicode Character Database, such as UnicodeData.txt. These files have a multi-column format requiring additional parsing support. This support is not enabled if these files are loaded using the External Properties tab. In the latter case, all Unibook reads is the first column, which usually contains the list of which character codes have a property value assignment in the file, but not what that assignment is. However, coverage information can be useful by itself. For example, using an external tool like grep allows to extract only those lines in a file that contain certain property values, and those lines can then be viewed in Unibook.
5. Troubleshooting
The following sections contain some brief troubleshooting tips.
5.1 Won't Run
5.1.1 Program won't run
Unibook 5.0 and later have only been tested on Windows XP and may not work in earlier versions of Windows. Some testing on Windows Vista and pre-release versions of Windows 7 has been done for version 5.2.0 of Unibook. Unibook 5.1.0 has been used on Windows 2000 and Wine(Linux) - BMP characters only, but so far, it is not known whether 5.2.0 or later run on these platforms as well. Unibook 6.1.1 has been tested on XP and Windows 7.
To verify that Unibook uses the correct set of files, try starting Unibook.exe manually as follows "Unibook Default.upr".
For standard installations, it is recommended to keep all files together and to start Unibook from within its directory.
5.1.2 Won't run after an update
Before trying anything else, go to the Windows control panel section for adding programs and select Repair for the Unibook installation. If this option is not available, you can run Unibook with the /Install parameter from the Windows desktop Start / Run... command or the command line. The second option requires that all the original files from the Unibook installation are still in the Unibook folder.
If these steps fail, you can try to manually clear out the registry from a previous version. On the
desktop click on Start / Run... In the edit field type REGEDIT or
REGEDT32. Click OK. In the Registry editor go to HKEY_CURRENT_USER /
Software. Select ASMUS-Inc then select Unibook.
Delete this key, then start Unibook. (This allows Unibook to start with a clean slate).
Caution: Editing the Windows registry can cause Windows to malfunction. Be sure only to edit the parts of the registry specific to Unibook.
Before deleting the registry key, consider exporting a copy of it with the File / Export command in RegEdit. If you forward a copy of the exported *.reg file to [email protected], it would aid in providing an eventual fix for this problem.
5.1.3 Pages appear to be missing
This is caused by the program detecting that there are no glyphs in the font for the given chart. Try repaginating using the step in 5.1.1 and make sure to set the ASCII offset field to the correct value. In addition, the Index view can be set to show empty pages. See the View/Show As... command.
5.1.4 Navigation with F7/F8 does not work
Make sure the highlighting is enabled. If necessary,
click on the ![]() icon. If highlighting is enabled, but there are missing pages due to limitations in the
font, navigation via F7/F8 may not work correctly. Select View/Show As...
and select Index View and make sure Show Empty pages is selected.
icon. If highlighting is enabled, but there are missing pages due to limitations in the
font, navigation via F7/F8 may not work correctly. Select View/Show As...
and select Index View and make sure Show Empty pages is selected.
5.1.5 Highlighting properties or search terms isn't working
Make sure that your foreground and background colors for highlighting are not inadvertently set to black on white.
If a property applies to Surrogate Code points, Private Use code points, noncharacters or unassigned characters (including those labeled <reserved> in the code charts), Unibook cannot show a highlight for these ranges. F7 and F8 may still jump to the page, but no cells will be colored with the highlight color. By default, Unibook displays hatched cells for private use characters. If Do not mark private use is checked on the Character Display tab in the Options/Format... dialog, then the hatching is disabled and Unibook can highlight properties for private use characters.
5.1.6 Unibook complains about a missing printer
When laying out the document, Unibook references the default printer installed on your system. If the printer is not available or not configured correctly, Unibook will base the layout on the current screen device. You will be able to use Unibook normally on-screen, but not be able to print. However, in some instances, printer drivers have been known to fail when queried about their availability. In such a case, you may need to define a different default printer before being able to use Unibook.
5.2 Displaying Characters
5.2.1 Blank cells
If cells appear blank, make sure the
 button is pressed. If this doesn't fix
the problem. your selected fonts do not cover the scripts or character
ranges you are viewing. If the only blank cells are for characters between 0000 and 00FF, the
setting of the ASCII offset in the
Options/ Format/ Character Display tab does not match your font or combined
font list.
In that case only, try setting
this value to zero or F000. (See also Special
Issues in 3.2 Combining Font List (*.cfl))
If Ctrl+Shift+click on the character shows <default>, your combining font
list (*.cfl) file does not contain a font definition for the character, or you
have temporarily selected a font with the
 button that does not cover the
character.
5.2.2 Glyphs are too large to fit into the cell
Duplicate the entry for the font in the CFL file, exclude the glyph range in question on the first entry using the /X switch, and select a smaller font size on the second entry.
5.2.3 Combining marks don't overlay right
If your font already contains the little dotted circle, remove the character entry from the *.cmb file. If your font requires a RTL convention for combining marks preceding the base character, add an entry to the *.rtl file (the same entity must also be entered in the *.cmb file).
5.2.4 Seeing boxes instead of dotted circles
You can set the character code used for showing the dotted circle in
Options/ Format/ Character Display. A single value is used for the whole file.
Select a value that matches a dotted circle character in one of the fonts
loaded. Character U+25CC DOTTED CIRCLE is used by many fonts for this purpose,
even though, the size and position of the character relative to its baseline is
different from the glyph used to indicate combining characters in the code
charts. There is a dotted circle character at E000 in Specials.ttf that
matches the glyph used in the code charts. When using default.cfl,
the offset to use is E000.
If you are viewing a single font, that font may not have a dotted circle glyph available.
5.2.6 Not seeing dotted circles characters for some combining characters
You must load a *.cmb file to tell Unibook which characters are combining
and should be imaged with a dotted circle. To create such a file, press
 and select "General Category" from
the UCD properties tab. In the listbox select the lines with Mn, Mc, Me and
press OK. Then select Tools / Save Selected Characters.. to save the
list. Rename this file so that is has a *.cmb extension, delete the line for
U+034F COMBINING GRAPHEME JOINER (because the
 Specials.ttf font has the dotted
circle already built-in for that glyph) and finally open the file via
File / Open.. .
5.2.7 Seeing multiple dotted circles
Unibook adds dotted circles on the fly in order to display combining marks. If you are using a special purpose font that is intended for code chart viewing, as opposed to real text usage, it may have dotted circles built in. In this case, just remove the corresponding entries in your *.cmb file (If the File/Project.. command doesn't show a *.cmb file loaded, Unibook is using information from the operating system or from the Unicode property files, and you need to provide an explicit *.cmb file instead to enable this override).
5.2.8 Seeing Wingdings instead of characters
Most likely one of the fonts contained in the *.cfl file is not installed on your system. Fonts used with the /S command, or with a SYMBOL setting for the charset field will be opened as symbol fonts. If no matching font is installed on your system, Wingdings (or some other Symbol font on your system) will be used instead by Windows. Ctrl+Shift+click on the affected character to identify the missing font (the required font is on the right side of the "=" sign).
5.2.9 Use of /O vs. /S in the combined font list
Both the /O and the /S command implement offsetting for a range of 128 characters. Use the /O for non-symbol fonts, and the /S for symbol fonts. Use the /Q switch to access a range of characters in a non-symbol font, transposed by some amount.
5.2.10 Error message "3,1 Subtable not found"
This is usually caused by a font with an unusual internal cmap table format. Try using the font with an entry in the *.cfl file that uses the /S command.
5.2.11 Clusters of 4 boxes in the character name list
Add a one line statement like this to the top of your *.cfl file:
Arial Narrow,22, /O=E200
5.2.12 Error messages when reading *.cfl files
Unibook checks each *.cfl file for consistency and redundant
entries. The file Default.cfl is an exception, since it must contain the
names of many fonts that may not be available on some machines. If you rename the
Default.cfl file, Unibook will loudly complain about any redundant entries (fonts that are listed but
not used). Just remove or comment out these entries to get rid of the warnings.
5.2.13 Supplementary character problems
Unibook fully supports supplementary characters (non-BMP characters that with code points beyond U+FFFF). If you have trouble displaying supplementary characters, even though you are using a font that has glyphs for these characters, add the following setting to your registry.
[HKEY_LOCAL_MACHINE\SOFTWARE\Microsoft\Windows NT\CurrentVersion\LanguagePack]
SURROGATE=(REG_DWORD)0x00000002
This setting enables Windows 2000 and later to use the internal Uniscribe module to display supplementary characters. If you have installed any of the language packs that cause Uniscribe to be loaded, the install should have made the appropriate changes already and you should not need to apply this setting manually. (Recent versions of Unibook attempt to set this registry value if missing, but this may not always succeed.)
Using the /Q command in a *.cfl file, you can also use a font with e.g. private use area assignment of glyphs for supplementary characters to image these at the correct location in the code charts. To show a glyph for the character at 1D400 from a font where it is located at E000, follow this example:
Font Name,22 /Q=1D400 /R=E000-E000
Fonts with complex script support that also contain characters in the supplementary planes need to be listed multiple times in the *.cfl file otherwise Unibook's attempt at disabling the complex script support for the code chart glyphs also disables the support for supplementary characters.
Font Name,22 /X=10000-10FFFF ; for BMP characters

Font Name,22 /X=0000-FFFF  ; for supplementary characters
Alternatively, the /I (include) command can be used instead of the /X (exclude) command, but the ranges are reversed in that case:
Font Name,22 /I=0000-FFFF  ; for BMP characters

Font Name,22 /I=10000-10FFFF ; for supplementary characters
If you are using a /Q command, make sure that the range specified with /R does not cross a plane boundary.
5.3 Installing Additional Fonts
5.3.1 How to install multilingual fonts for Microsoft Office, or Microsoft Windows
The website http://www.unicode.org/help/display_problems.html is regularly updated with instructions on how to install additional fonts for Microsoft Office and Microsoft Windows.
5.3.2 How to install Everson Mono Unicode
Everson Mono Unicode is a large monospaced font created by Michael Everson of Everson Typography. It is distributed as shareware. See http://evertype.com/emono for details. After downloading the font and extracting the TTF file into a folder on your disk, open the Windows fonts folder with the Start/Control Panel/Fonts command. From the menu, select Install... and in the Install dialog select your folder and double click on Everson Mono Unicode when it appears in the window.
5.3.3 How to install Code2000
Code2000 is a large proportionally spaced font created by James Kass It is distributed as shareware. See http://www.code2000.net/code2000_page.htm for details. After downloading the font and extracting the TTF file into a folder on your disk, open the Windows fonts folder with the Start/Control Panel/Fonts command. From the menu, select Install... and in the Install dialog select your folder and double click on Code2000 when it appears in the window.
Caution: There have been indications that some accounts associated with the creator of this font have been hacked. The font may no longer be available from the source or the site may contain malware. Use appropriate caution.
5.3.4 Designating a large font as a default or last resort font
If you want a large font, such as Arial Unicode MS, Code2000,
or Everson Mono Unicode to be your default font, edit the
Default.cfl file to move the line containing it near the beginning, but after
the entries for the special characters. That way, it will always be used for any
character it supports. If instead you want the font to be your font of
last resort, move it to the end of the file; that way, it will be used anytime
no other font has a glyph for a given character.
You should rename the file after you have edited it. It will then complain about unused entries. Comment these out and reload the file.
5.4 Files
5.4.1 The last character or line in a file is ignored
Add an empty line. Unibook generally requires files to have a terminal line feed.
5.4.2 Unicode in files
Unibook can read Unicode-encoded plain text files, as long as
they are prefixed with a BOM (U+FEFF) and are in little-endian byte order.
This is useful for creating
*.cfl
files that use fonts which only have
localized names. Using little-endian UTF-16 for name lists works, but
characters outside the range 0000..00FF will usually be in a different font
from the remaining text. UTF-8 is
not supported.
5.4.3 Error messages when reading the nameslist (*.lst) files
These should happen only when opening nameslists that have been edited by the user, occasionally for beta versions of this file. Usually, simply hitting ignore will be sufficient to allow the file to open. For a permanent fix, edit the offending line(s) in the file to fix the errors. (See the section describing the Nameslist File.) Unibook maintains an internal database of "known issues" with prior public versions of the official Unicode nameslist files, some of which contain minor syntax errors. If one of those files is detected, any known errors for that file are ignored permanently.
5.4.4 Can't open files by double clicking
Unibook sets the necessary registry keys to inform the
Windows Shell that it can handle the *.lst and
*.upr file types and installs itself as the default handler for these file types
during installation (at the time you accept the Unibook license). If another
program has modified the shell, you can right click on a file name in the shell
and use the Open With... command to override the settings. However, that
sometimes fails to 'stick'. In that case, you can force re-installation by
restarting Unibook after deleting just the Registration subkey under Unibook
in the registry. Do so by appropriately modifying the steps in 5.1.2.
Note, re-installation loads the Default.upr file, which restores many
settings to their default value.
5.5 Other Tips
5.5.1 Forcing repagination
Simply select Options/Format/Nameslist Layout and click OK. This will force a re-layout, even when no changes were made. Changing a setting in the View / Show As dialog, or opening the *.lst file via File/Open.. will also cause a re-layout.
5.5.2 Return to factory defaults
Follow the steps in 5.1.2. This resets all stored user information and configurations. The next time the program starts, you will be asked to sign in again.
5.5.3 Reloading a file
Use the list of recent files in the File menu to reload a project,
nameslist, font configuration or format file. If the list is empty, try opening
the file default.upr with the File/ Open..
command.
5.5.4 ISO or Unicode margins and tabs look odd
Both the Unicode and the ISO format need specific margin and tab settings to
look good. While it is possible to switch between the views with a button, the
margins and tab setting remain. The default.fmt that comes with
Unibook uses a set of margins and tabs that give somewhat acceptable results for
both, but do not match the actual margin or tab settings for either publication.
If you create margin and tab settings that are specific to either view, save
your preferred settings into one or more *.fmt
files with the
File/Save As..
command and load these files to switch views.
5.5.5 Viewing the private use area
Unibook normally suppresses all unassigned blocks or private use areas. By default, it also suppresses the display of any character code not defined in the nameslist. See the section on viewing fonts for instructions on how to view fonts with characters in the private use area.
Copyright © 1995-2024 ASMUS, Inc. All Rights Reserved. This
version of Unibook is distributed by the Unicode Consortium under a license
from ASMUS, Inc., subject to the end user license agreement shown during
startup and viewable via the Help/About/License.. command. This
documentation file may not be republished in full or in part, except for the
purpose of reviewing Unibook. Unibook and ASMUS are trademarks of ASMUS,
Inc. Unicode is a registered trademark of the Unicode Consortium. Microsoft
Windows and Microsoft Office are trademarks of
Microsoft Corporation. Other terms may be trademarks of their respective
trademark owners, whether identified or not.

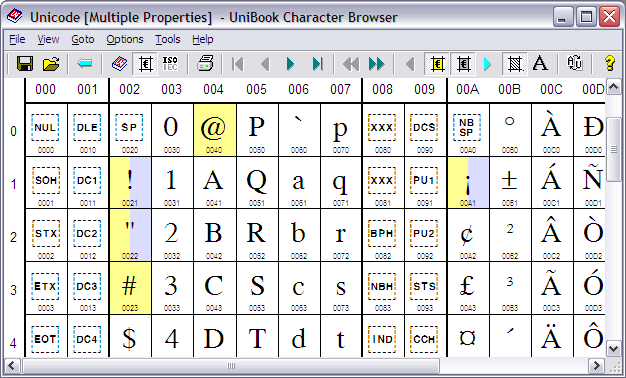
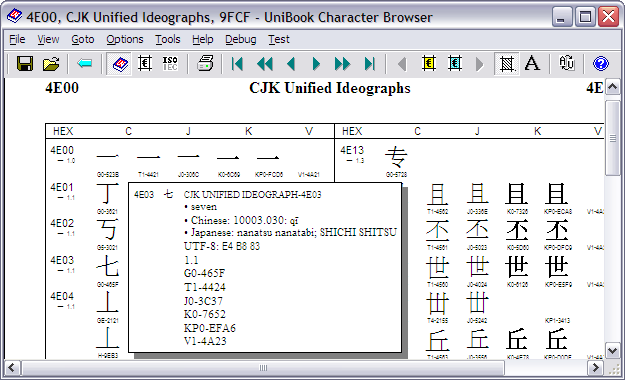
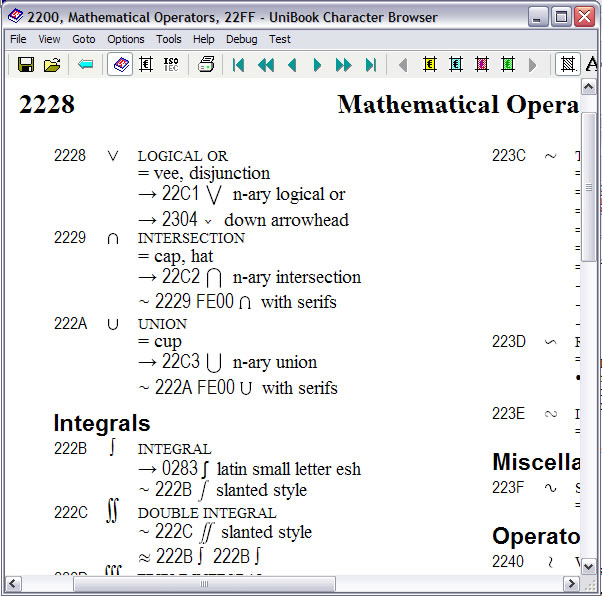
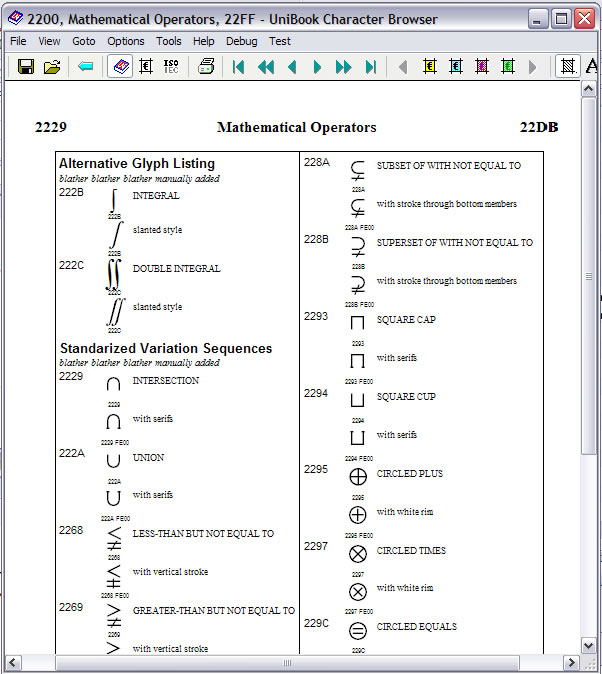


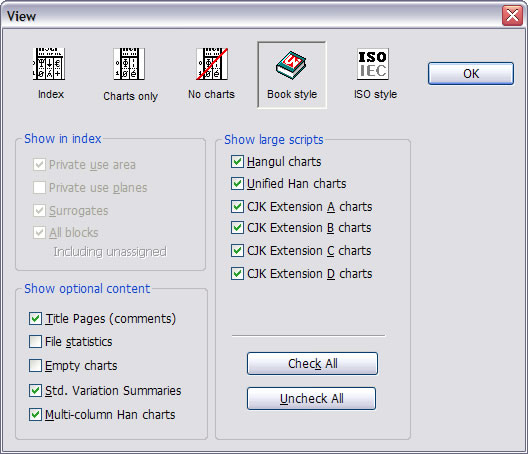
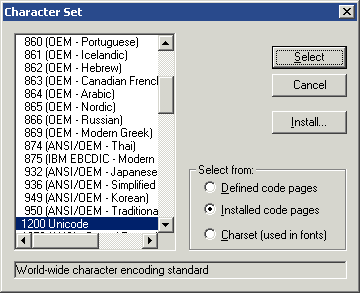
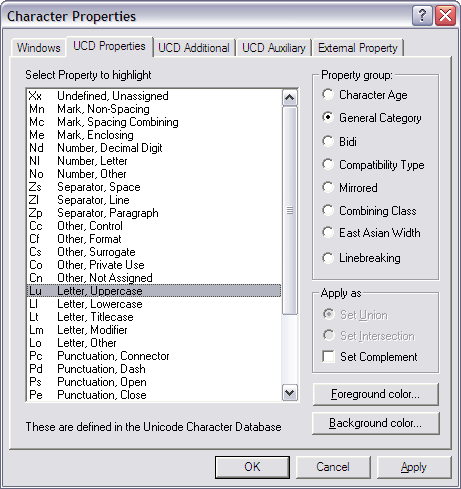

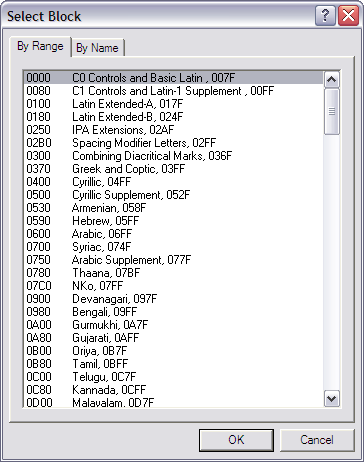
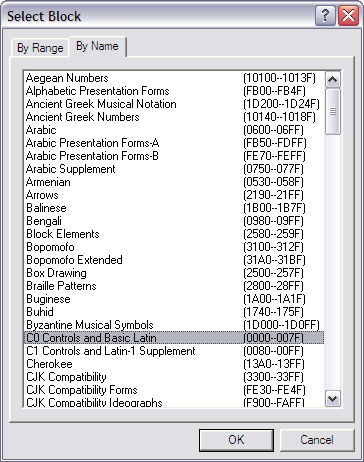
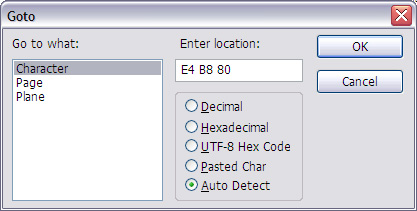
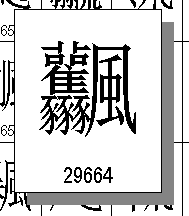
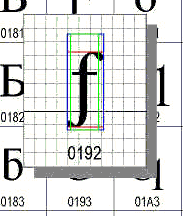
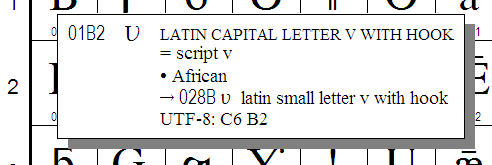
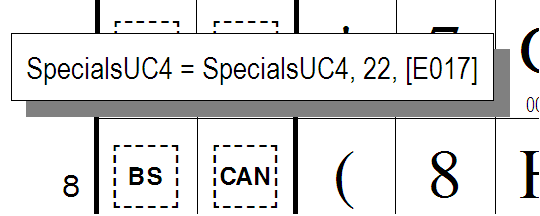 /
/